在此範例中,你可以學習到如何將FortiGate單元調整為NAT或是Route模式,並將之安裝到內網與網際網路的連接點上。
In NAT/Route mode, a FortiGate unit is installed as a gateway or router between two networks. In most cases, it is used between a private network and the Internet. This allows the FortiGate to hide the IP addresses of the private network using network address translation (NAT).*
FortiGate單元在NAT模式下,其作用類似連接內外網的Gateway;在Route模式下,其作用類似連接內外網的Router,在大多數情況下,FortiGate會安裝在內部網路與網際網路之間,這樣才能使用NAT模式隱藏內網使用的private IP,使其連接內部與外部網路。
(註:開始安裝前需要先決定FortiGate實體port使用的模式是Switch還是Interface,這部分請參考 )


(註:開始安裝前需要先決定FortiGate實體port使用的模式是Switch還是Interface,這部分請參考 )
1. Connecting the network devices and logging onto the FortiGate
連接網路設備並登入FortiGate

Connect the FortiGate’s Internet-facing interface(typically WAN1) to your ISP-supplied equipment and Connect a PC to the FortiGate using an internal port (typically port 1).
將FortiGate連接到網際網路方面的介面(通常為WAN1)連接到ISP業者提供的設備上(通常是接到中華電信的小烏龜上),並將一台電腦的網路線連接到FortiGate連接內網方面的Port(通常為port 1)
Power on the ISP’s equipment, the FortiGate unit, and the PC on the internal network.
確保ISP業者的設備、FortiGate以及連接在網路上的電腦這三者的電源皆已啟動
確保ISP業者的設備、FortiGate以及連接在網路上的電腦這三者的電源皆已啟動

From the PC on the internal network, connect to the FortiGate’s web-based manager using either FortiExplorer or an Internet browser (for information about connecting to the web-based manager, please see your models QuickStart Guide).
從連上此網路的電腦上進行操作,使用FortiExplorer或是網頁瀏覽器,連到FortiGate的網頁管理介面,網頁管理介面的IP請參考各型號產品的QuickStart Guide
(網頁管理介面的預設IP為192.168.1.99/24)
從連上此網路的電腦上進行操作,使用FortiExplorer或是網頁瀏覽器,連到FortiGate的網頁管理介面,網頁管理介面的IP請參考各型號產品的QuickStart Guide
(網頁管理介面的預設IP為192.168.1.99/24)
Login using an admin account (the default admin account has the username admin and no password).
使用帳號admin登入 (預設帳號admin,無密碼)
使用帳號admin登入 (預設帳號admin,無密碼)
2. Configuring the FortiGate’s interfaces
設定FortiGate的介面
 If have some ISP equipment between your FortiGate and the Internet (for example, a router), then the wan1 IP will also use a private IP assigned by the ISP equipment. If this equipment uses DHCP, set Addressing Modeto DHCP to get an IP assigned to the interface.
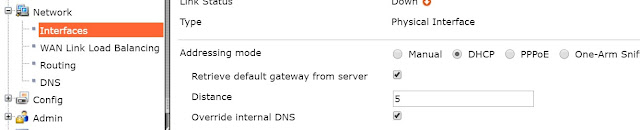
若是在FortiGate及網際網路之間裝有ISP業者提供的其他設備,則FortiGate在wan1使用的IP同樣會是Private IP以對應ISP業者的設備(小烏龜),如果該設備(小烏龜)有啟用DHCP功能,則設定FortiGate的wan1介面時,請選擇DHCP模式直接由該設備(小烏龜)自動派發IP及遮罩
If the ISP equipment does not use DHCP, your ISP can provide you with the correct private IP to use for the interface.
Go to System > Network > Interfaces and edit the Internet-facing interface.
點選到 系統 > 網路 > 介面 ,並在用於連接網際網路的介面項目點擊編輯
點選到 系統 > 網路 > 介面 ,並在用於連接網際網路的介面項目點擊編輯
If your FortiGate is directly connecting to your ISP, set Addressing Mode to Manual and set the IP/Netmask to the public IP address your ISP has provided you with.
若您的FortiGate是直接連接到ISP的話,請在該介面上設定ISP業者提供的IP及遮罩。(具體方法為點選到wan1 > 編輯 > 在Addressing mode點選到Manual,再輸入IP及遮罩)
若您的FortiGate是直接連接到ISP的話,請在該介面上設定ISP業者提供的IP及遮罩。(具體方法為點選到wan1 > 編輯 > 在Addressing mode點選到Manual,再輸入IP及遮罩)
 If have some ISP equipment between your FortiGate and the Internet (for example, a router), then the wan1 IP will also use a private IP assigned by the ISP equipment. If this equipment uses DHCP, set Addressing Modeto DHCP to get an IP assigned to the interface.
若是在FortiGate及網際網路之間裝有ISP業者提供的其他設備,則FortiGate在wan1使用的IP同樣會是Private IP以對應ISP業者的設備(小烏龜),如果該設備(小烏龜)有啟用DHCP功能,則設定FortiGate的wan1介面時,請選擇DHCP模式直接由該設備(小烏龜)自動派發IP及遮罩
If the ISP equipment does not use DHCP, your ISP can provide you with the correct private IP to use for the interface.
若ISP業者提供的設備(小烏龜)沒有DHCP功能,則可以向ISP業者詢問正確對應的Private IP以便設定FortiGate的wan1介面


Edit the internal interface (called lan on some FortiGate models).
編輯internal介面(部分型號上,此項目為lan)
Set Addressing Mode to Manual and set the IP/Netmask to the private IP address you wish to use for the FortiGate.
在FortiGate上,對該介面設定IP/遮罩

FortiGate產品的預設DNS設定為FortiGuard DNS伺服器,對於大部分的網路環境來說,此設定已經足以滿足大多數的環境需求,如果你需要變更DNS相關設定,請照以下步驟點選:
系統(System) > 網路(Network) > DNS ,點擊specify,並在 Primary 以及 Secondary DNS輸入所需的DNS設定


Set the Incoming Interface to the internal interface and the Outgoing Interface to the Internet-facing interface.
 Scroll down to view the Logging Options. In order to view the results later, enable Log Allowed Traffic and select All Sessions.
將畫面向下拖動到Logging Options的部分,為了稍後可以確認到紀錄(log),啟用Log Allowed Traffic並點選到All Sessions
3. Adding a default route
設定預設路由
| |
Go to Router > Static > Static Routes (or System > Network > Routing, depending on your FortiGate model) and create a new route.
點擊 路由(Router) > 靜態(Static) > 靜態路由(Static Routes)
或是 系統(System) > 網路(Network) > 路由(Routing) [依型號不同而有些微差異]進入後,點擊create new開始設定預設路由 
Set the Destination IP/Mask to 0.0.0.0/0.0.0.0, the Device to the Internet-facing interface, and the Gateway to the gateway (or default route) provided by your ISP or to the next hop router, depending on your network requirements.

設定目的IP/遮罩這個項目為 0.0.0.0/0.0.0.0,設備選擇連接到外部網路的FortiGate介面(通常為wan1),Gateway設定由ISP業者提供或是在ISP業者的設備與FortiGate之間有Router或其他具路由功能的設備的話,就設定成與該設備連接的該設備端口IP,此項目依您的網路架構而定。
| |
4. (Optional) Setting the FortiGate’s DNS servers

The FortiGate unit’s DNS Settings are set to use FortiGuard DNS servers by default, which is sufficient for most networks. However, if you need to change the DNS servers, go to System > Network > DNSand add Primary and Secondary DNS servers.
FortiGate產品的預設DNS設定為FortiGuard DNS伺服器,對於大部分的網路環境來說,此設定已經足以滿足大多數的環境需求,如果你需要變更DNS相關設定,請照以下步驟點選:
系統(System) > 網路(Network) > DNS ,點擊specify,並在 Primary 以及 Secondary DNS輸入所需的DNS設定
5. Creating a policy to allow traffic from the internal network to the Internet*
建立政策使流量從內網移動到外網
Go to Policy & Objects > Policy > IPv4 and create a new policy (if your network uses IPv6 addresses, go to Policy & Objects > Policy > IPv6).
點選到政策&物件 > 政策 > IPv4 > create new 建立新的過濾規則
(若要使用IPv6的話,先啟用IPv6:System > Config > Features > IPv6 > Apply,接著再建立過濾規則:Policy & Objects > Policy > IPv6 > )
(若要使用IPv6的話,先啟用IPv6:System > Config > Features > IPv6 > Apply,接著再建立過濾規則:Policy & Objects > Policy > IPv6 > )

Set the Incoming Interface to the internal interface and the Outgoing Interface to the Internet-facing interface.
將來源介面(Incoming Interface)設為內網使用的介面(internal),將目的介面(Outgoing Interface)設為連接網際網路部分的介面(wan1)
Make sure the Action is set to ACCEPT. Turn on NAT and make sure Use Destination Interface Address is selected (later versions of FortiOS 5.2 call this option Use Outgoing Interface Address).
確定動作(Action)設定為接受(ACCEPT)。啟用NAT(預設已啟用)並確定有勾選"使用出口端介面位址"(預設已勾選)(FortiOS 5.2.x的版本中,此項目為使用出去介面位址。)
將畫面向下拖動到Logging Options的部分,為了稍後可以確認到紀錄(log),啟用Log Allowed Traffic並點選到All Sessions
5. Results | |
You can now browse the Internet using any computer that connects to the FortiGate’s internal interface.
您現在可以透過任意一台與FortiGate內網連接的電腦隨意瀏覽網頁
You can view information about the traffic being processed by your FortiGate by going to System > FortiView > All Sessions and finding traffic that has the internal interface as the Src Interface and the Internet-facing interface as the Dst Interface.
 您可以照以下步驟操作來檢視那些通過FortiGate留下的資訊:
點擊到 System > FortiView > All Sessions,要找到您瀏覽網頁的紀錄,請分別確認來源(Src Interface)為內網(internal)以及目的(Dst Interface)為連接網際網路的介面(通常為Wan1)

If these two columns are not shown, right-click on the title row, select Src Interface and Dst Interface from the dropdown menu, and then select Apply.
若這兩列並未出現,在標題行上點擊滑鼠右鍵,在下拉式選單中選擇來源介面(Src Interface)及目的介面(Dst Interface),並點擊確認(Apply)
(系統版本不同,則部分介面也會有不同的外觀或位在不同的地方)
| |
Borgata Hotel Casino and Spa - MapYRO
回覆刪除Find 경주 출장샵 the best Borgata Hotel Casino and Spa location in Atlantic City and superb hotel deals from 목포 출장안마 MapYRO. Browse 28 hotels and places to stay closest to 군포 출장안마 Borgata 군산 출장마사지 Casino 김해 출장안마 and